
Arm Lift in Thailand: Scars, Recovery & Candidacy Guide
Wondering if arm lift scars are really that bad — and whether recovery in Thailand is worth the risk? Let’s get straight to the facts. Without clear, evidence‑based information, you could end up with hidden costs, unrealistic expectations, or worse — a poor surgical outcome. By the end of this guide, you’ll know exactly who qualifies, what recovery looks like week by week, how to manage scars, and how to choose a safe, accredited clinic in Thailand. We’ll walk through candidacy, the procedure, recovery, scar management, risks, costs, and clinic selection — all backed by medical research.
Key Takeaways
Arm lift in Thailand can dramatically improve arm contour, but it requires realistic expectations about scars, recovery, and candidacy.
- Candidacy first: Stable weight for 6+ months and good health matter more than age.
- Recovery takes time: Most return to work at 2–4 weeks; full activity at 6–8 weeks.
- Scars are permanent but manageable: Silicone sheets and laser therapy reduce visibility.
- Thailand saves 50–70% vs. the US, with access to JCI‑accredited hospitals.
What Is an Arm Lift? Understanding Brachioplasty
An arm lift, medically known as brachioplasty, is a surgical procedure that removes excess skin and fat from the upper arms to create a smoother, more contoured appearance. The procedure is most commonly sought by patients who have lost significant weight or experienced natural skin laxity with aging. Understanding the different techniques and candidacy criteria is the first step toward making an informed decision.
The Procedure Explained: Mini vs Full Arm Lift
A mini arm lift focuses on the armpit area with a shorter incision, typically 3–4 cm, and is best suited for patients with mild skin laxity near the axilla. The incision is hidden within the natural crease of the armpit, making it less visible. In contrast, a full arm lift extends from the armpit to the elbow, removing a larger ellipse of skin and reshaping the entire arm contour. This approach addresses moderate to severe laxity but leaves a linear scar along the inner arm.
The choice between mini and full depends on how much excess skin you have. During a consultation, your surgeon will perform a pinch test and evaluate skin tone. A systematic review on brachioplasty patient selection recommends that patients with less than 4 cm of pinchable skin may be candidates for a mini lift, while those with more than 6 cm typically require a full procedure. Scar length is the primary trade‑off: mini leaves a 3–4 cm armpit scar, while full results in a scar from armpit to elbow that fades significantly over time.
Once you understand the options, the next step is determining if you’re a suitable candidate — a decision that depends on several key factors.
How Brachioplasty Differs From Other Arm Contouring Options
Brachioplasty is often confused with liposuction or non‑surgical skin tightening, but the procedures serve very different purposes. Liposuction removes fat but does not tighten loose skin — it can even worsen skin laxity in post‑weight‑loss patients. Non‑surgical options like radiofrequency or ultrasound offer mild tightening but cannot remove significant excess skin. Brachioplasty is the gold standard for moderate‑to‑severe skin laxity because it physically excises the excess tissue.
If you have good skin elasticity and only fat, liposuction may suffice. But if your skin bounces back slowly after being pinched, an arm lift is more appropriate. The distinction is critical: choosing the wrong procedure can leave you disappointed with minimal improvement or even worse contour irregularities.
Now let’s look at the specific criteria that make someone a good candidate for an arm lift.
Candidacy Checklist: Who Is a Good Candidate?
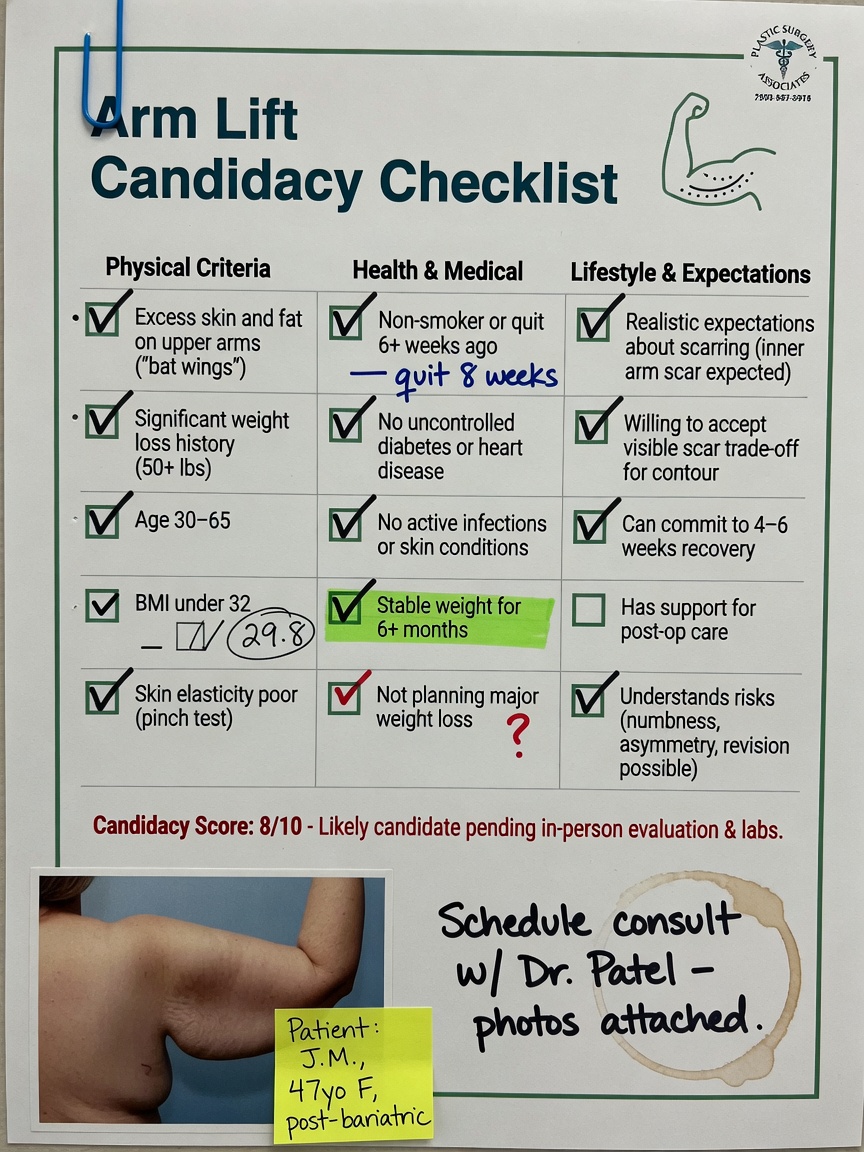
A systematic review of 34 studies identifies four core criteria for brachioplasty candidacy. Here’s what you need before considering surgery:
- Stable weight for at least 6 months — weight fluctuations can alter results and increase complication risk.
- Good overall health — no uncontrolled diabetes, hypertension, or active smoking. Smokers must quit 4 weeks before surgery.
- Sufficient skin laxity — you should be able to pinch at least 3–4 cm of loose skin on your upper arms.
- Realistic expectations — you must accept a permanent scar and understand the recovery timeline.
Age is a common concern — let’s address it directly.
Is 70 Too Old for Brachioplasty? Age and Candidacy
Age alone is not a contraindication for brachioplasty. Stanford Health Care states that candidacy depends more on health status, medications, and weight stability than chronological age. A healthy 70‑year‑old with stable weight may be a better candidate than an obese 45‑year‑old smoker. The key is a thorough pre‑op evaluation — including cardiac and pulmonary clearance if needed. Many older patients undergo arm lift successfully and report high satisfaction with their results.
Assuming you meet the candidacy criteria, the next major concern is recovery — how long it takes and how painful it is.
Arm Lift Recovery: What to Expect Week by Week
Brachioplasty recovery follows a predictable timeline, but individual healing varies. Michigan Medicine reports return to work at 2–4 weeks after brachioplasty, with full activity at 6–8 weeks. Understanding each phase helps you plan time off and set realistic expectations.
| Phase | Key Activities | Restrictions |
|---|---|---|
| Week 1 | Rest, light movement, drain removal | No lifting >2 kg, keep arms elevated |
| Week 2 | Suture removal, begin gentle stretching | Still no heavy lifting or driving |
| Weeks 3–4 | Return to desk work, light walking | No overhead reaching or exertion |
| Weeks 5–8 | Gradual increase in activity | Full strength returns around 8 weeks |
| 12+ weeks | Scar maturation, full exercise | Listen to your body; avoid extreme stretching |
Recovery Timeline: First 2 Weeks
Days 0–1 are spent in the hospital with your arms loosely bandaged, drains in place, and pain medication administered. The Michigan Medicine recovery guide notes that most patients go home on day 1 with oral pain medication. By day 3–7, the first follow‑up appointment occurs: drains are removed, and you begin gentle arm movement to prevent stiffness. Swelling peaks around day 5. At week 2, sutures are removed, and you can start light daily activities — though lifting remains limited to 2 kg (about 5 lbs).
After the first two weeks, most patients start feeling like themselves again.
Weeks 3–4: Returning to Normal Activities
By week 3, you may return to a desk job if you can work without lifting or reaching overhead. Driving is permitted once you’re no longer taking narcotics and can move your arms comfortably to steer. Heavy lifting (over 5 kg) remains off‑limits until at least week 6. Patients in manual labor jobs typically require 6–8 weeks off. The arm lift recovery pace is steady — don’t rush it.
Pain is a top concern — here’s what the research says.
How Painful Is Brachioplasty? Pain Management Tips
Most patients describe the pain as moderate, not severe. A prospective study of 150 patients found that multimodal analgesia — a combination of NSAIDs and acetaminophen — effectively controlled pain with minimal side effects. The worst discomfort occurs in the first 48 hours and subsides significantly by day 7. Many patients report more tightness and pulling than sharp pain. Feeling tightness is normal; sharp or increasing pain may signal a complication like hematoma or infection, and you should contact your surgeon immediately.
Once you’re through the initial recovery, scar management becomes a priority.
When Can You Return to Work and Exercise?
- Desk work: 2–4 weeks.
- Light cardio (walking, stationary bike): After 4 weeks.
- Heavy lifting (gym, manual labor): 8+ weeks, with gradual progression.
- Overhead sports (swimming, tennis): 8–12 weeks, depending on healing.
Listen to your surgeon’s specific clearance — returning too early can cause wound dehiscence or hypertrophic scarring.
Now let’s address the concern that often worries patients most: scars.
Understanding Arm Lift Scars and Scar Management
Arm lift scars are inevitable — the incision must be long enough to remove excess skin. But with proper care, most scars fade significantly over 12–18 months. A meta‑analysis of brachioplasty outcomes reports hypertrophic scarring in 12.4% of cases — silicone sheets and laser therapy reduce thickness and discoloration for those who develop raised scars.
Why Arm Lift Scars Are Inevitable (and Why They’re Worth It)
The scar line runs along the inner arm from armpit to elbow (full lift) or just in the armpit (mini lift). It’s placed intentionally where it’s least visible when arms are at your sides. The trade‑off is significant: improved arm contour that doesn’t sag or flap when you move. Most patients report high satisfaction and say the scar is a small price for dramatically better arm appearance. Stanford Health Care emphasizes that realistic expectations about scar location are part of being a good candidate.
Fortunately, effective treatments exist to improve scar appearance.
Evidence‑Based Scar Management: Silicone, Laser, and More
Johns Hopkins Medicine recommends these strategies for optimizing surgical scars:
- Silicone sheets or gel — first‑line treatment, start 2–4 weeks after wound closure, wear 12 hours daily for 3–6 months.
- Pulsed dye laser — reduces redness and thickness, typically 2–4 sessions.
- Massage and hydration — gentle daily massage with moisturizer softens scar tissue.
- Sun protection — SPF 50+ prevents hyperpigmentation for at least 12 months.
- Steroid injections — for hypertrophic or keloid scars, administered by your surgeon.
Patience is key — scars can take over a year to fully mature.
How Long Does It Take for Brachioplasty Scars to Fade?
The scar appears red and raised at 6 weeks. It begins fading at 3–6 months and reaches maturity at 12–18 months, becoming a pale, flat line. Early intervention with silicone sheets and sun protection gives the best results.
Now, let’s discuss the potential complications that every patient should understand.
Arm Lift Risks and Complications
Every surgery carries risks, and brachioplasty is no exception. The most common complications are seroma (fluid buildup), wound dehiscence (incision separation), and infection. A meta‑analysis of 34 studies reports these rates:
| Complication | Rate | Signs | Action |
|---|---|---|---|
| Seroma | 5.2% | Fluid pocket, swelling | May require aspiration |
| Wound dehiscence | 3.8% | Incision edges separate | Higher in smokers, requires wound care |
| Infection | 2.1% | Redness, fever, discharge | Antibiotics, possible drainage |
Common Complications: Seroma, Infection, Wound Issues
Seroma is the most common complication, occurring in about 1 in 20 patients. It appears as a fluid‑filled pocket that may require needle drainage. Wound dehiscence is more common in smokers — the incision fails to heal properly and opens partially. Infection is rare but serious, requiring prompt antibiotic treatment. The CDC report on medical tourism infections found 15 cases of surgical site infections among returning medical tourists — many chose unaccredited facilities.
The good news is that many of these risks can be minimized with proper preparation.
How to Minimize Risks: Surgeon Choice and Pre‑Op Prep
- Choose a board‑certified plastic surgeon with hospital privileges at an accredited facility.
- Stop smoking at least 4 weeks before surgery — smoking reduces blood flow and triples dehiscence risk.
- Optimize weight — don’t plan an arm lift while still actively losing or gaining.
- Manage chronic conditions — diabetes and hypertension should be well‑controlled.
- Follow all pre‑op instructions, including stopping certain medications (aspirin, NSAIDs).
Patients who follow these steps have significantly lower complication rates.
What to Do If You Experience Complications
Contact your surgeon immediately if you experience fever, increasing pain, wound discharge, or asymmetry. Early intervention — whether it’s draining a seroma or starting antibiotics — prevents minor issues from becoming serious. Your clinic should provide 24/7 contact information for emergencies.
Cost is often the deciding factor. Let’s see how Thailand compares.
How Much Does an Arm Lift Cost in Thailand?
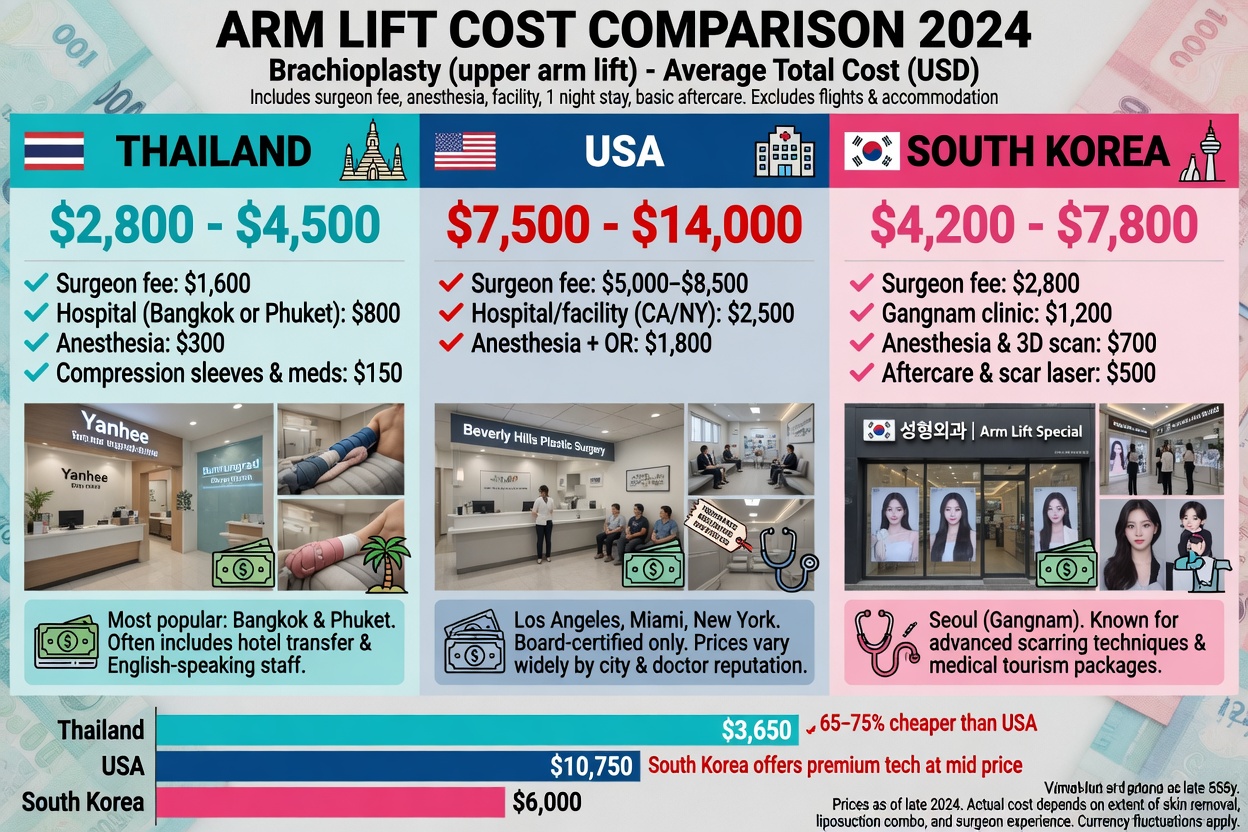
The U.S. Department of Commerce reports that Thailand offers cost savings of 50–70% for medical procedures, including brachioplasty. An arm lift in Thailand typically costs $3,000–$6,000 for a full procedure, while the same surgery in the United States runs $8,000–$15,000 (surgeon fee only — facility and anesthesia are extra). South Korea averages $5,000–$8,000.
Arm Lift Cost Thailand vs. USA vs. South Korea
| Destination | Average Cost (Full Arm Lift) | Typical Stay | Package Inclusions |
|---|---|---|---|
| Thailand | $3,000–$6,000 | 7–10 days | Surgeon, anesthesia, hospital stay, follow‑up |
| United States | $8,000–$15,000 | Outpatient or 1 night | Surgeon fee only (facility/anesthesia extra) |
| South Korea | $5,000–$8,000 | 7–10 days | Surgeon, hospital stay, some follow‑up |
Thailand’s medical tourism sector attracts 2.5 million patients annually, driven by high‑quality care at a fraction of Western prices. However, “cheapest” is not always “best” — the Arm Lift Readiness Compass reminds you that cost is only one factor alongside health, expectations, and scar acceptance.
What drives the price differences? Let’s break it down.
What Factors Affect the Price?
Several variables affect the final cost of an arm lift in Thailand:
- Hospital accreditation — JCI‑accredited hospitals like Bumrungrad or Bangkok Hospital command higher fees but offer international safety standards.
- Surgeon experience — a senior board‑certified surgeon with 20+ years will charge more than a recent graduate.
- Extent of surgery — mini arm lift costs less than full; combined procedures (e.g., arm lift + liposuction) increase the total.
- Package inclusions — all‑inclusive packages cover surgeon, anesthesia, hospital stay, medication, and follow‑up. À la carte pricing can surprise you with extras.
A mini arm lift at a JCI‑accredited Bangkok hospital may cost $4,500, while a full lift at a smaller clinic could be $3,000 — but safety should never take a back seat to price.
Many clinics offer all‑inclusive packages — here’s what to look for.
All‑Inclusive Arm Lift Packages: What’s Included?
Most reputable clinics, such as those listed on Bookimed, offer packages that cover:
- Surgeon’s fee
- Anesthesia
- Hospital stay (typically 1–3 nights)
- Operating room costs
- Medications and medical supplies
- Follow‑up consultations
- Airport transfer and accommodation for companion
What is often NOT included:
- Pre‑operative tests (blood work, ECG — budget ~$200)
- Compression garments (~$50–100)
- Scar treatment (silicone sheets, laser)
- Extended stay or nursing after discharge
Read the fine print — ask for a written breakdown before depositing any money.
How to Choose a Clinic and Surgeon in Thailand
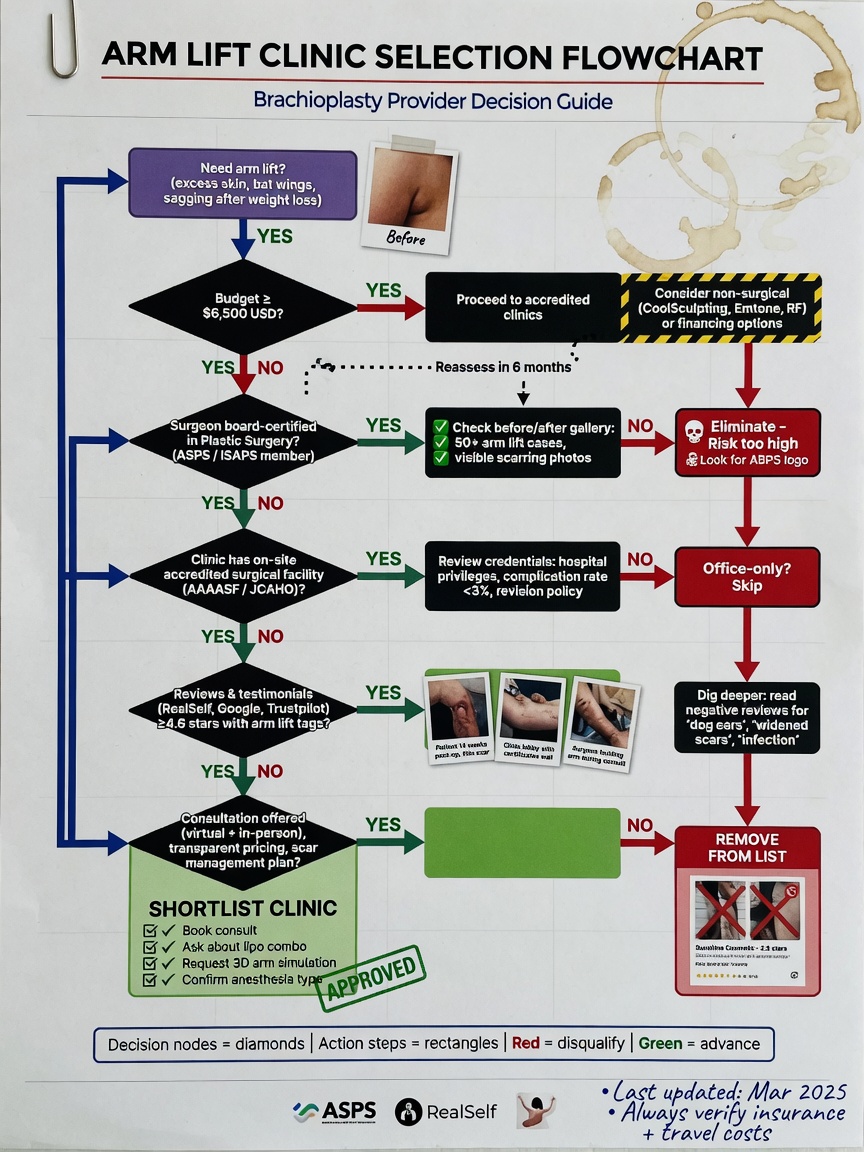
Selecting the right provider is the most critical decision you’ll make. The CDC reported 15 cases of surgical site infections among medical tourists returning to the US after cosmetic surgery abroad — emphasizing the need for accredited providers. The Arm Lift Readiness Compass places provider selection alongside the other three factors: weight stability, health, and scar acceptance.
Accreditation and Credentials to Look For
When evaluating a clinic, ask specifically about these credentials:
- JCI accreditation — international gold standard for hospital quality. Thailand has over 60 JCI‑accredited hospitals.
- Thai Board of Plastic Surgery — the surgeon must be board‑certified by the Thai Medical Council.
- Hospital privileges — the surgeon should be affiliated with an accredited hospital, not just a standalone clinic.
- Volume of arm lifts — ask how many brachioplasties the surgeon performs annually. High volume correlates with lower complication rates.
The CDC report notes that most infections in returning medical tourists occurred in patients who chose facilities without international accreditation — a preventable risk.
Recommended Hospitals and Clinics for Arm Lift in Thailand
While no single “best” hospital fits everyone, these facilities are well‑regarded among international patients:
| Hospital | Location | Accreditation | Arm Lift Price Range |
|---|---|---|---|
| Bumrungrad International Hospital | Bangkok | JCI, Thai Board | $4,000–$6,000 |
| Bangkok Hospital | Bangkok | JCI, HA Thailand | $3,500–$5,500 |
| Phuket Plastic Surgery Institute | Phuket | JCI | $3,000–$5,000 |
| PAI Thailand (Preecha Aesthetic Institute) | Bangkok | HA Thailand | $3,000–$4,500 |
ClinicsOnCall provides a directory of board‑certified plastic surgeons in Thailand — use it alongside these recommendations to shortlist providers.
Before you book, prepare a list of questions to ask during your virtual consultation.
Questions to Ask Your Surgeon Before Booking
Write these down and take notes during your call:
- “How many arm lifts do you perform annually?”
- “What are your infection and revision rates?”
- “Can I see before‑and‑after photos of patients with similar skin type and degree of laxity?”
- “What is included in the package? Are there any hidden fees?”
- “What happens if I experience a complication after returning home?”
- “Do you have hospital privileges at a JCI‑accredited facility?”
A confident, transparent surgeon will answer these directly. If you get vague answers, consider it a red flag.
Now that you have a complete picture, let’s consider when an arm lift might not be the best choice.
Limitations & When to Reconsider
This information is for educational purposes only and does not constitute medical advice. Always consult a qualified surgeon for personalized guidance.
Common Pitfalls When Choosing Arm Lift
Three pitfalls can lead to disappointing results:
- Rushing into surgery without stable weight — losing or gaining more than 5–10 pounds after your arm lift can ruin the contour. Wait until your weight has been steady for at least 6 months.
- Expecting zero scars — if you cannot accept a permanent scar on your inner arm, brachioplasty is not for you. No surgical technique can remove excess skin without leaving a mark.
- Choosing a non‑accredited clinic for lower cost — the CDC report clearly links infections to unaccredited facilities. Saving $1,000 is not worth a 5.2% seroma risk that could require a second surgery.
When to Choose Alternatives
- Mild skin laxity only — liposuction or radiofrequency skin tightening may give you the look you want without a scar.
- Health conditions that increase surgical risk — uncontrolled diabetes, severe hypertension, or active smoking — consider non‑surgical options or accept your current appearance.
- Zero scar tolerance — if even a fine line under your arm would bother you, don’t proceed. Non‑surgical methods can provide a modest improvement.
Medical Disclaimer: The content on this page is for informational purposes only and does not constitute medical advice, diagnosis, or treatment. Arm lift surgery carries risks, and results vary per individual. Always consult a board‑certified plastic surgeon to evaluate your specific candidacy.
Frequently Asked Questions
1. Who is a good candidate for arm lift?
A good arm lift candidate has stable weight for at least six months, good overall health, and realistic expectations about scars and recovery. Age alone is not a barrier; a healthy 70‑year‑old can be a candidate. Sufficient skin laxity is essential — if you can pinch loose skin on your upper arms, you may qualify. Smokers should quit at least four weeks before surgery to reduce complication risk. Consult a board‑certified plastic surgeon for a personalized evaluation.
2. How painful is brachioplasty surgery?
Most patients describe brachioplasty pain as moderate, not severe, and well‑controlled with oral medication. A study of 150 patients found that a combination of NSAIDs and acetaminophen effectively managed pain with minimal side effects. The worst discomfort typically occurs in the first 48–72 hours and subsides significantly by day 7. Many patients report more tightness and pulling than sharp pain.
3. Why are brachioplasty scars so bad?
Brachioplasty scars appear long because the incision runs from the armpit to the elbow to remove the maximum amount of excess skin. However, the scar line fades significantly over 12–18 months and can be managed with silicone sheets, laser therapy, and sun protection. Hypertrophic scarring occurs in about 12% of cases, but treatment can reduce thickness and discoloration. Most patients feel the trade‑off is worth the improved arm contour.
4. How much does arm lift cost in Thailand?
An arm lift in Thailand typically costs between $3,000 and $6,000, which is 50–70% less than in the United States. The price depends on the extent of surgery (mini vs. full), hospital accreditation, and whether the package is all‑inclusive. Many JCI‑accredited hospitals offer transparent packages covering surgeon fees, anesthesia, hospital stay, and follow‑up visits. Compare prices across clinics but prioritize safety and experience over the lowest price.
5. Which is the best hospital in Thailand for plastic surgery?
While “best” depends on your specific needs, several hospitals in Thailand are internationally accredited for plastic surgery: Bumrungrad International, Bangkok Hospital, and Phuket Plastic Surgery Institute. The key is to choose a facility with JCI accreditation and a surgeon who is board‑certified by the Thai Board of Plastic Surgery. Check patient reviews, ask about the surgeon’s arm lift volume, and request a virtual consultation to assess communication.
Conclusion
For adults considering an arm lift in Thailand, the decision comes down to four factors: weight stability, health status, realistic expectations, and scar acceptance — the Arm Lift Readiness Compass. With cost savings of 50–70% and access to JCI‑accredited hospitals, Thailand offers an affordable path to improved arm contour — but only if you’re a true candidate.
The Arm Lift Readiness Compass helps you self‑assess before investing time and money. Start with weight stability, then health status, then evaluate whether you can accept a permanent scar. Finally, choose an accredited provider — don’t let low cost override safety.
Schedule a virtual consultation with a board‑certified surgeon in Thailand. Ask about their experience, complication rates, and package details. Use this guide to ask the right questions — and remember: a safe journey starts with a well‑informed decision.